mirror of
https://github.com/datawhalechina/llms-from-scratch-cn.git
synced 2026-11-11 10:10:58 +00:00

138 KiB
138 KiB
|
Supplementary code for the Build a Large Language Model From Scratch book by Sebastian Raschka Code repository: https://github.com/rasbt/LLMs-from-scratch |

|
In [1]:
from importlib.metadata import version

pkgs = ["matplotlib",
        "numpy",
        "tiktoken",
        "torch",
        "tensorflow", # For OpenAI's pretrained weights
        "pandas"      # Dataset loading
       ]
for p in pkgs:
    print(f"{p} version: {version(p)}")
matplotlib version: 3.8.2 numpy version: 1.26.0 tiktoken version: 0.5.1 torch version: 2.2.2 tensorflow version: 2.15.0 pandas version: 2.2.1

In [2]:
import urllib.request
import zipfile
import os
from pathlib import Path

url = "https://archive.ics.uci.edu/static/public/228/sms+spam+collection.zip"
zip_path = "sms_spam_collection.zip"
extracted_path = "sms_spam_collection"
data_file_path = Path(extracted_path) / "SMSSpamCollection.tsv"

def download_and_unzip_spam_data(url, zip_path, extracted_path, data_file_path):
    if data_file_path.exists():
        print(f"{data_file_path} already exists. Skipping download and extraction.")
        return

    # 下载文件
    with urllib.request.urlopen(url) as response:
        with open(zip_path, "wb") as out_file:
            out_file.write(response.read())

    # 解压文件
    with zipfile.ZipFile(zip_path, "r") as zip_ref:
        zip_ref.extractall(extracted_path)

    # 添加 .tsv 文件扩展
    original_file_path = Path(extracted_path) / "SMSSpamCollection"
    os.rename(original_file_path, data_file_path)
    print(f"File downloaded and saved as {data_file_path}")

download_and_unzip_spam_data(url, zip_path, extracted_path, data_file_path)
sms_spam_collection/SMSSpamCollection.tsv already exists. Skipping download and extraction.
In [3]:
import pandas as pd

df = pd.read_csv(data_file_path, sep="\t", header=None, names=["Label", "Text"])
df
Out [3]:
| Label | Text | |
|---|---|---|
| 0 | ham | Go until jurong point, crazy.. Available only ... |
| 1 | ham | Ok lar... Joking wif u oni... |
| 2 | spam | Free entry in 2 a wkly comp to win FA Cup fina... |
| 3 | ham | U dun say so early hor... U c already then say... |
| 4 | ham | Nah I don't think he goes to usf, he lives aro... |
| ... | ... | ... |
| 5567 | spam | This is the 2nd time we have tried 2 contact u... |
| 5568 | ham | Will ü b going to esplanade fr home? |
| 5569 | ham | Pity, * was in mood for that. So...any other s... |
| 5570 | ham | The guy did some bitching but I acted like i'd... |
| 5571 | ham | Rofl. Its true to its name |
5572 rows × 2 columns
In [4]:
print(df["Label"].value_counts())Label ham 4825 spam 747 Name: count, dtype: int64
In [5]:
def create_balanced_dataset(df):

    # 计算"spam"实例的数量
    num_spam = df[df["Label"] == "spam"].shape[0]

    # 随机采样"ham"实例以匹配"spam"实例的数量
    ham_subset = df[df["Label"] == "ham"].sample(num_spam, random_state=123)

    # 将"ham"子集与"spam"结合起来
    balanced_df = pd.concat([ham_subset, df[df["Label"] == "spam"]])

    return balanced_df

balanced_df = create_balanced_dataset(df)
print(balanced_df["Label"].value_counts())
Label ham 747 spam 747 Name: count, dtype: int64
In [6]:
balanced_df["Label"] = balanced_df["Label"].map({"ham": 0, "spam": 1})In [7]:
def random_split(df, train_frac, validation_frac):
    # 打乱整个 DataFrame
    df = df.sample(frac=1, random_state=123).reset_index(drop=True)

    # 计算切分索引
    train_end = int(len(df) * train_frac)
    validation_end = train_end + int(len(df) * validation_frac)

    # 切分 DataFrame
    train_df = df[:train_end]
    validation_df = df[train_end:validation_end]
    test_df = df[validation_end:]

    return train_df, validation_df, test_df

train_df, validation_df, test_df = random_split(balanced_df, 0.7, 0.1)
# 测试大小默认为 0.2

train_df.to_csv("train.csv", index=None)
validation_df.to_csv("validation.csv", index=None)
test_df.to_csv("test.csv", index=None)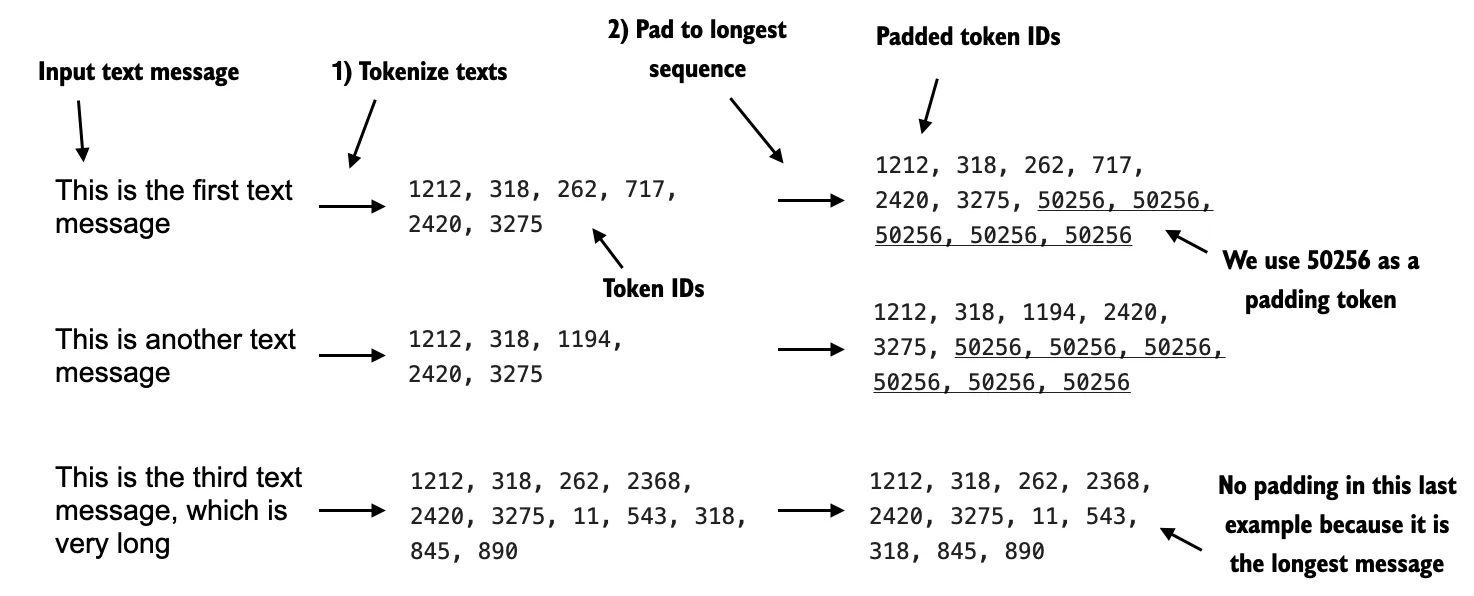
In [8]:
import tiktoken

tokenizer = tiktoken.get_encoding("gpt2")
print(tokenizer.encode("<|endoftext|>", allowed_special={"<|endoftext|>"}))
[50256]
In [9]:
import torch
from torch.utils.data import Dataset


class SpamDataset(Dataset):
    def __init__(self, csv_file, tokenizer, max_length=None, pad_token_id=50256):
        self.data = pd.read_csv(csv_file)

        # 预标记文本
        self.encoded_texts = [
            tokenizer.encode(text) for text in self.data["Text"]
        ]

        if max_length is None:
            self.max_length = self._longest_encoded_length()
        else:
            self.max_length = max_length
            # 如果序列长于 max_length,则截断序列
            self.encoded_texts = [
                encoded_text[:self.max_length]
                for encoded_text in self.encoded_texts
            ]

        # 将序列填充到最长序列
        self.encoded_texts = [
            encoded_text + [pad_token_id] * (self.max_length - len(encoded_text))
            for encoded_text in self.encoded_texts
        ]

    def __getitem__(self, index):
        encoded = self.encoded_texts[index]
        label = self.data.iloc[index]["Label"]
        return (
            torch.tensor(encoded, dtype=torch.long),
            torch.tensor(label, dtype=torch.long)
        )

    def __len__(self):
        return len(self.data)

    def _longest_encoded_length(self):
        max_length = 0
        for encoded_text in self.encoded_texts:
            encoded_length = len(encoded_text)
            if encoded_length > max_length:
                max_length = encoded_length
        return max_length
In [10]:
train_dataset = SpamDataset(
    csv_file="train.csv",
    max_length=None,
    tokenizer=tokenizer
)

print(train_dataset.max_length)
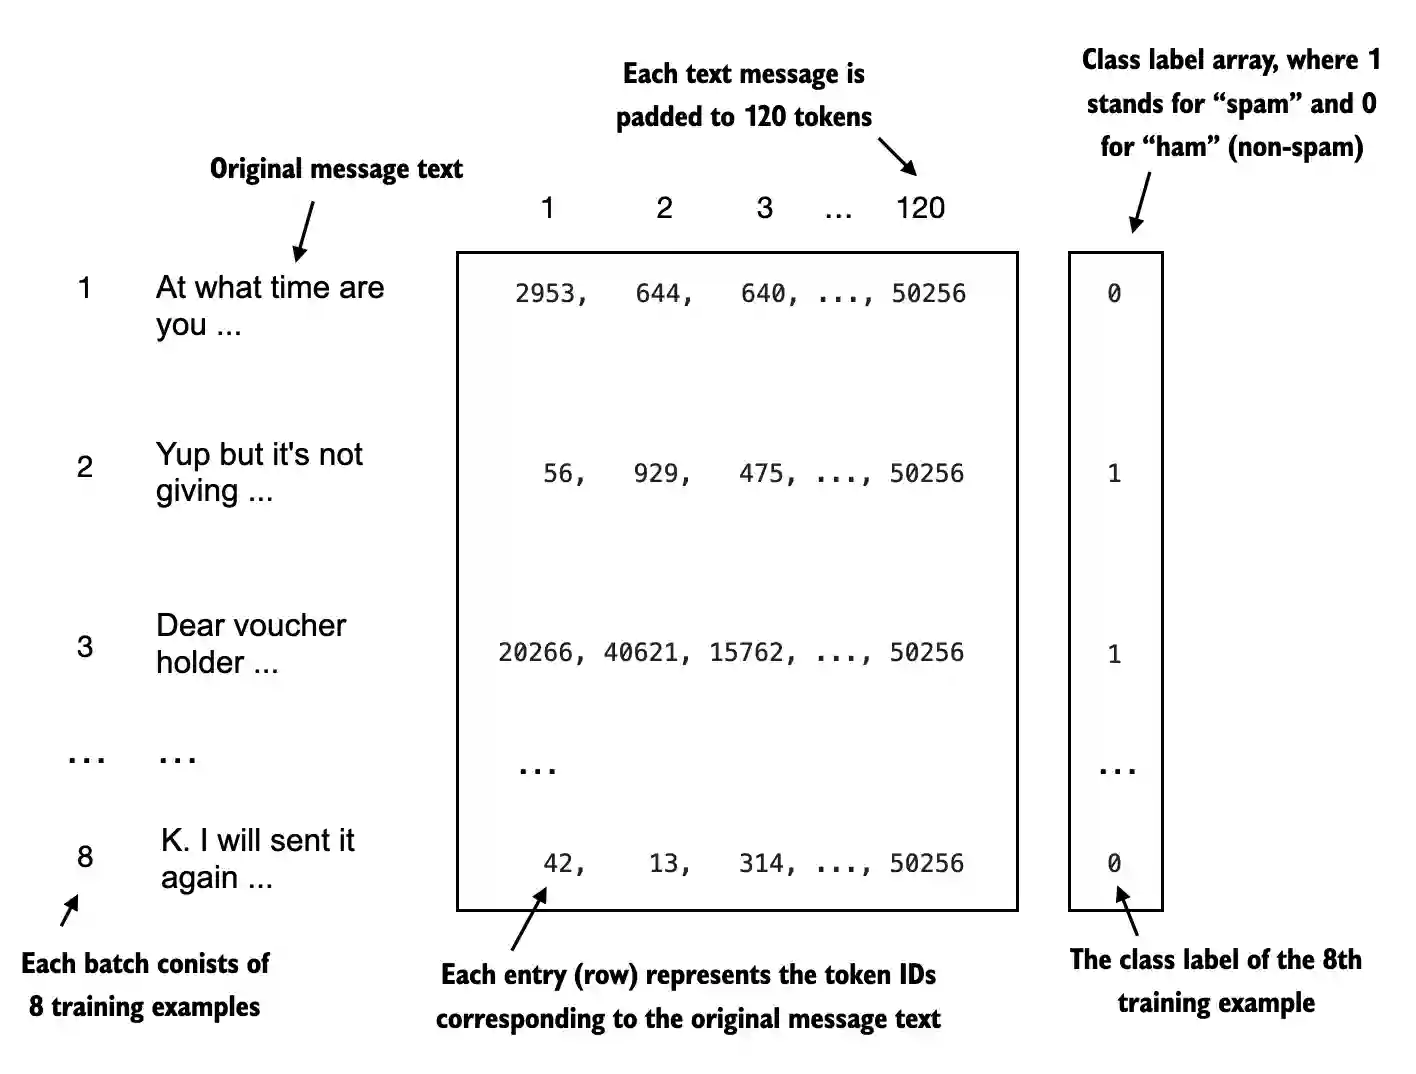
120
In [11]:
val_dataset = SpamDataset(
    csv_file="validation.csv",
    max_length=train_dataset.max_length,
    tokenizer=tokenizer
)
test_dataset = SpamDataset(
    csv_file="test.csv",
    max_length=train_dataset.max_length,
    tokenizer=tokenizer
)
In [12]:
from torch.utils.data import DataLoader

num_workers = 0
batch_size = 8

torch.manual_seed(123)

train_loader = DataLoader(
    dataset=train_dataset,
    batch_size=batch_size,
    shuffle=True,
    num_workers=num_workers,
    drop_last=True,
)

val_loader = DataLoader(
    dataset=val_dataset,
    batch_size=batch_size,
    num_workers=num_workers,
    drop_last=False,
)

test_loader = DataLoader(
    dataset=test_dataset,
    batch_size=batch_size,
    num_workers=num_workers,
    drop_last=False,
)In [13]:
print("Train loader:")
for input_batch, target_batch in train_loader:
    pass

print("Input batch dimensions:", input_batch.shape)
print("Label batch dimensions", target_batch.shape)
Train loader: Input batch dimensions: torch.Size([8, 120]) Label batch dimensions torch.Size([8])
In [14]:
print(f"{len(train_loader)} training batches")
print(f"{len(val_loader)} validation batches")
print(f"{len(test_loader)} test batches")
130 training batches 19 validation batches 38 test batches
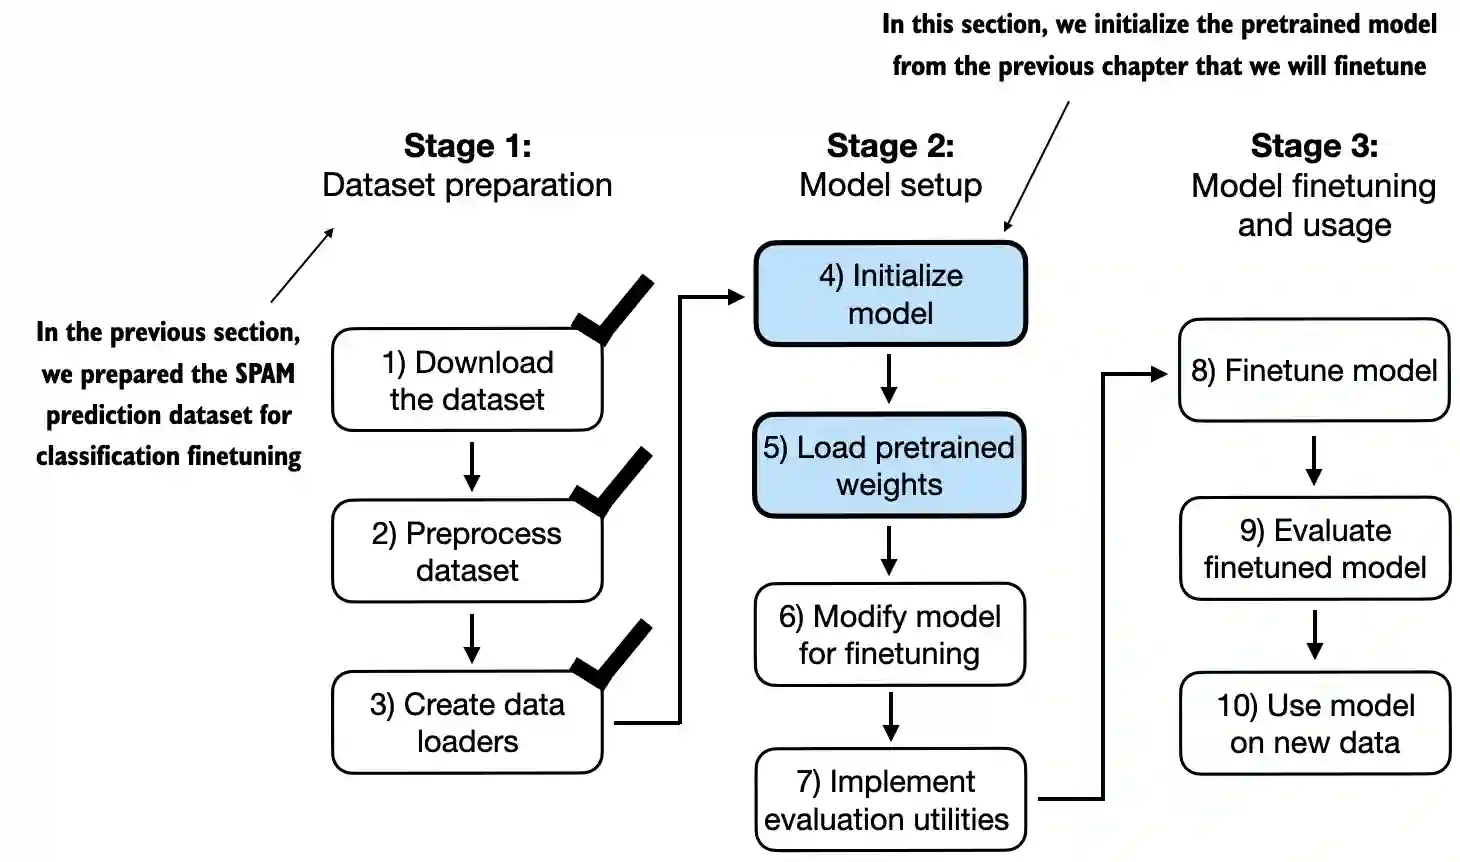
- 在本节中,我们初始化上一章中使用的预训练模型
In [15]:
CHOOSE_MODEL = "gpt2-small (124M)"
INPUT_PROMPT = "Every effort moves"

BASE_CONFIG = {
    "vocab_size": 50257,     # Vocabulary size
    "context_length": 1024,  # Context length
    "drop_rate": 0.0,        # Dropout rate
    "qkv_bias": True         # Query-key-value bias
}

model_configs = {
    "gpt2-small (124M)": {"emb_dim": 768, "n_layers": 12, "n_heads": 12},
    "gpt2-medium (355M)": {"emb_dim": 1024, "n_layers": 24, "n_heads": 16},
    "gpt2-large (774M)": {"emb_dim": 1280, "n_layers": 36, "n_heads": 20},
    "gpt2-xl (1558M)": {"emb_dim": 1600, "n_layers": 48, "n_heads": 25},
}

BASE_CONFIG.update(model_configs[CHOOSE_MODEL])
In [16]:
from gpt_download import download_and_load_gpt2
from previous_chapters import GPTModel, load_weights_into_gpt

model_size = CHOOSE_MODEL.split(" ")[-1].lstrip("(").rstrip(")")
settings, params = download_and_load_gpt2(model_size=model_size, models_dir="gpt2")

model = GPTModel(BASE_CONFIG)
load_weights_into_gpt(model, params)
model.eval();
File already exists and is up-to-date: gpt2/124M/checkpoint File already exists and is up-to-date: gpt2/124M/encoder.json File already exists and is up-to-date: gpt2/124M/hparams.json File already exists and is up-to-date: gpt2/124M/model.ckpt.data-00000-of-00001 File already exists and is up-to-date: gpt2/124M/model.ckpt.index File already exists and is up-to-date: gpt2/124M/model.ckpt.meta File already exists and is up-to-date: gpt2/124M/vocab.bpe
In [17]:
from previous_chapters import (
    generate_text_simple,
    text_to_token_ids,
    token_ids_to_text
)


text_1 = "Every effort moves you"

token_ids = generate_text_simple(
    model=model,
    idx=text_to_token_ids(text_1, tokenizer),
    max_new_tokens=15,
    context_size=BASE_CONFIG["context_length"]
)

print(token_ids_to_text(token_ids, tokenizer))
Every effort moves you forward. The first step is to understand the importance of your work
In [18]:
text_2 = (
    "Is the following text 'spam'? Answer with 'yes' or 'no':"
    " 'You are a winner you have been specially"
    " selected to receive $1000 cash or a $2000 award.'"
    " Answer with 'yes' or 'no'."
)

token_ids = generate_text_simple(
    model=model,
    idx=text_to_token_ids(text_2, tokenizer),
    max_new_tokens=23,
    context_size=BASE_CONFIG["context_length"]
)

print(token_ids_to_text(token_ids, tokenizer))
Is the following text 'spam'? Answer with 'yes' or 'no': 'You are a winner you have been specially selected to receive $1000 cash or a $2000 award.' Answer with 'yes' or 'no'. Answer with 'yes' or 'no'. Answer with 'yes' or 'no'. Answer with 'yes'

In [19]:
print(model)GPTModel(
(tok_emb): Embedding(50257, 768)
(pos_emb): Embedding(1024, 768)
(drop_emb): Dropout(p=0.0, inplace=False)
(trf_blocks): Sequential(
(0): TransformerBlock(
(att): MultiHeadAttention(
(W_query): Linear(in_features=768, out_features=768, bias=True)
(W_key): Linear(in_features=768, out_features=768, bias=True)
(W_value): Linear(in_features=768, out_features=768, bias=True)
(out_proj): Linear(in_features=768, out_features=768, bias=True)
(dropout): Dropout(p=0.0, inplace=False)
)
(ff): FeedForward(
(layers): Sequential(
(0): Linear(in_features=768, out_features=3072, bias=True)
(1): GELU()
(2): Linear(in_features=3072, out_features=768, bias=True)
)
)
(norm1): LayerNorm()
(norm2): LayerNorm()
(drop_resid): Dropout(p=0.0, inplace=False)
)
(1): TransformerBlock(
(att): MultiHeadAttention(
(W_query): Linear(in_features=768, out_features=768, bias=True)
(W_key): Linear(in_features=768, out_features=768, bias=True)
(W_value): Linear(in_features=768, out_features=768, bias=True)
(out_proj): Linear(in_features=768, out_features=768, bias=True)
(dropout): Dropout(p=0.0, inplace=False)
)
(ff): FeedForward(
(layers): Sequential(
(0): Linear(in_features=768, out_features=3072, bias=True)
(1): GELU()
(2): Linear(in_features=3072, out_features=768, bias=True)
)
)
(norm1): LayerNorm()
(norm2): LayerNorm()
(drop_resid): Dropout(p=0.0, inplace=False)
)
(2): TransformerBlock(
(att): MultiHeadAttention(
(W_query): Linear(in_features=768, out_features=768, bias=True)
(W_key): Linear(in_features=768, out_features=768, bias=True)
(W_value): Linear(in_features=768, out_features=768, bias=True)
(out_proj): Linear(in_features=768, out_features=768, bias=True)
(dropout): Dropout(p=0.0, inplace=False)
)
(ff): FeedForward(
(layers): Sequential(
(0): Linear(in_features=768, out_features=3072, bias=True)
(1): GELU()
(2): Linear(in_features=3072, out_features=768, bias=True)
)
)
(norm1): LayerNorm()
(norm2): LayerNorm()
(drop_resid): Dropout(p=0.0, inplace=False)
)
(3): TransformerBlock(
(att): MultiHeadAttention(
(W_query): Linear(in_features=768, out_features=768, bias=True)
(W_key): Linear(in_features=768, out_features=768, bias=True)
(W_value): Linear(in_features=768, out_features=768, bias=True)
(out_proj): Linear(in_features=768, out_features=768, bias=True)
(dropout): Dropout(p=0.0, inplace=False)
)
(ff): FeedForward(
(layers): Sequential(
(0): Linear(in_features=768, out_features=3072, bias=True)
(1): GELU()
(2): Linear(in_features=3072, out_features=768, bias=True)
)
)
(norm1): LayerNorm()
(norm2): LayerNorm()
(drop_resid): Dropout(p=0.0, inplace=False)
)
(4): TransformerBlock(
(att): MultiHeadAttention(
(W_query): Linear(in_features=768, out_features=768, bias=True)
(W_key): Linear(in_features=768, out_features=768, bias=True)
(W_value): Linear(in_features=768, out_features=768, bias=True)
(out_proj): Linear(in_features=768, out_features=768, bias=True)
(dropout): Dropout(p=0.0, inplace=False)
)
(ff): FeedForward(
(layers): Sequential(
(0): Linear(in_features=768, out_features=3072, bias=True)
(1): GELU()
(2): Linear(in_features=3072, out_features=768, bias=True)
)
)
(norm1): LayerNorm()
(norm2): LayerNorm()
(drop_resid): Dropout(p=0.0, inplace=False)
)
(5): TransformerBlock(
(att): MultiHeadAttention(
(W_query): Linear(in_features=768, out_features=768, bias=True)
(W_key): Linear(in_features=768, out_features=768, bias=True)
(W_value): Linear(in_features=768, out_features=768, bias=True)
(out_proj): Linear(in_features=768, out_features=768, bias=True)
(dropout): Dropout(p=0.0, inplace=False)
)
(ff): FeedForward(
(layers): Sequential(
(0): Linear(in_features=768, out_features=3072, bias=True)
(1): GELU()
(2): Linear(in_features=3072, out_features=768, bias=True)
)
)
(norm1): LayerNorm()
(norm2): LayerNorm()
(drop_resid): Dropout(p=0.0, inplace=False)
)
(6): TransformerBlock(
(att): MultiHeadAttention(
(W_query): Linear(in_features=768, out_features=768, bias=True)
(W_key): Linear(in_features=768, out_features=768, bias=True)
(W_value): Linear(in_features=768, out_features=768, bias=True)
(out_proj): Linear(in_features=768, out_features=768, bias=True)
(dropout): Dropout(p=0.0, inplace=False)
)
(ff): FeedForward(
(layers): Sequential(
(0): Linear(in_features=768, out_features=3072, bias=True)
(1): GELU()
(2): Linear(in_features=3072, out_features=768, bias=True)
)
)
(norm1): LayerNorm()
(norm2): LayerNorm()
(drop_resid): Dropout(p=0.0, inplace=False)
)
(7): TransformerBlock(
(att): MultiHeadAttention(
(W_query): Linear(in_features=768, out_features=768, bias=True)
(W_key): Linear(in_features=768, out_features=768, bias=True)
(W_value): Linear(in_features=768, out_features=768, bias=True)
(out_proj): Linear(in_features=768, out_features=768, bias=True)
(dropout): Dropout(p=0.0, inplace=False)
)
(ff): FeedForward(
(layers): Sequential(
(0): Linear(in_features=768, out_features=3072, bias=True)
(1): GELU()
(2): Linear(in_features=3072, out_features=768, bias=True)
)
)
(norm1): LayerNorm()
(norm2): LayerNorm()
(drop_resid): Dropout(p=0.0, inplace=False)
)
(8): TransformerBlock(
(att): MultiHeadAttention(
(W_query): Linear(in_features=768, out_features=768, bias=True)
(W_key): Linear(in_features=768, out_features=768, bias=True)
(W_value): Linear(in_features=768, out_features=768, bias=True)
(out_proj): Linear(in_features=768, out_features=768, bias=True)
(dropout): Dropout(p=0.0, inplace=False)
)
(ff): FeedForward(
(layers): Sequential(
(0): Linear(in_features=768, out_features=3072, bias=True)
(1): GELU()
(2): Linear(in_features=3072, out_features=768, bias=True)
)
)
(norm1): LayerNorm()
(norm2): LayerNorm()
(drop_resid): Dropout(p=0.0, inplace=False)
)
(9): TransformerBlock(
(att): MultiHeadAttention(
(W_query): Linear(in_features=768, out_features=768, bias=True)
(W_key): Linear(in_features=768, out_features=768, bias=True)
(W_value): Linear(in_features=768, out_features=768, bias=True)
(out_proj): Linear(in_features=768, out_features=768, bias=True)
(dropout): Dropout(p=0.0, inplace=False)
)
(ff): FeedForward(
(layers): Sequential(
(0): Linear(in_features=768, out_features=3072, bias=True)
(1): GELU()
(2): Linear(in_features=3072, out_features=768, bias=True)
)
)
(norm1): LayerNorm()
(norm2): LayerNorm()
(drop_resid): Dropout(p=0.0, inplace=False)
)
(10): TransformerBlock(
(att): MultiHeadAttention(
(W_query): Linear(in_features=768, out_features=768, bias=True)
(W_key): Linear(in_features=768, out_features=768, bias=True)
(W_value): Linear(in_features=768, out_features=768, bias=True)
(out_proj): Linear(in_features=768, out_features=768, bias=True)
(dropout): Dropout(p=0.0, inplace=False)
)
(ff): FeedForward(
(layers): Sequential(
(0): Linear(in_features=768, out_features=3072, bias=True)
(1): GELU()
(2): Linear(in_features=3072, out_features=768, bias=True)
)
)
(norm1): LayerNorm()
(norm2): LayerNorm()
(drop_resid): Dropout(p=0.0, inplace=False)
)
(11): TransformerBlock(
(att): MultiHeadAttention(
(W_query): Linear(in_features=768, out_features=768, bias=True)
(W_key): Linear(in_features=768, out_features=768, bias=True)
(W_value): Linear(in_features=768, out_features=768, bias=True)
(out_proj): Linear(in_features=768, out_features=768, bias=True)
(dropout): Dropout(p=0.0, inplace=False)
)
(ff): FeedForward(
(layers): Sequential(
(0): Linear(in_features=768, out_features=3072, bias=True)
(1): GELU()
(2): Linear(in_features=3072, out_features=768, bias=True)
)
)
(norm1): LayerNorm()
(norm2): LayerNorm()
(drop_resid): Dropout(p=0.0, inplace=False)
)
)
(final_norm): LayerNorm()
(out_head): Linear(in_features=768, out_features=50257, bias=False)
)
In [20]:
for param in model.parameters():
param.requires_grad = FalseIn [21]:
torch.manual_seed(123)

num_classes = 2
model.out_head = torch.nn.Linear(in_features=BASE_CONFIG["emb_dim"], out_features=num_classes)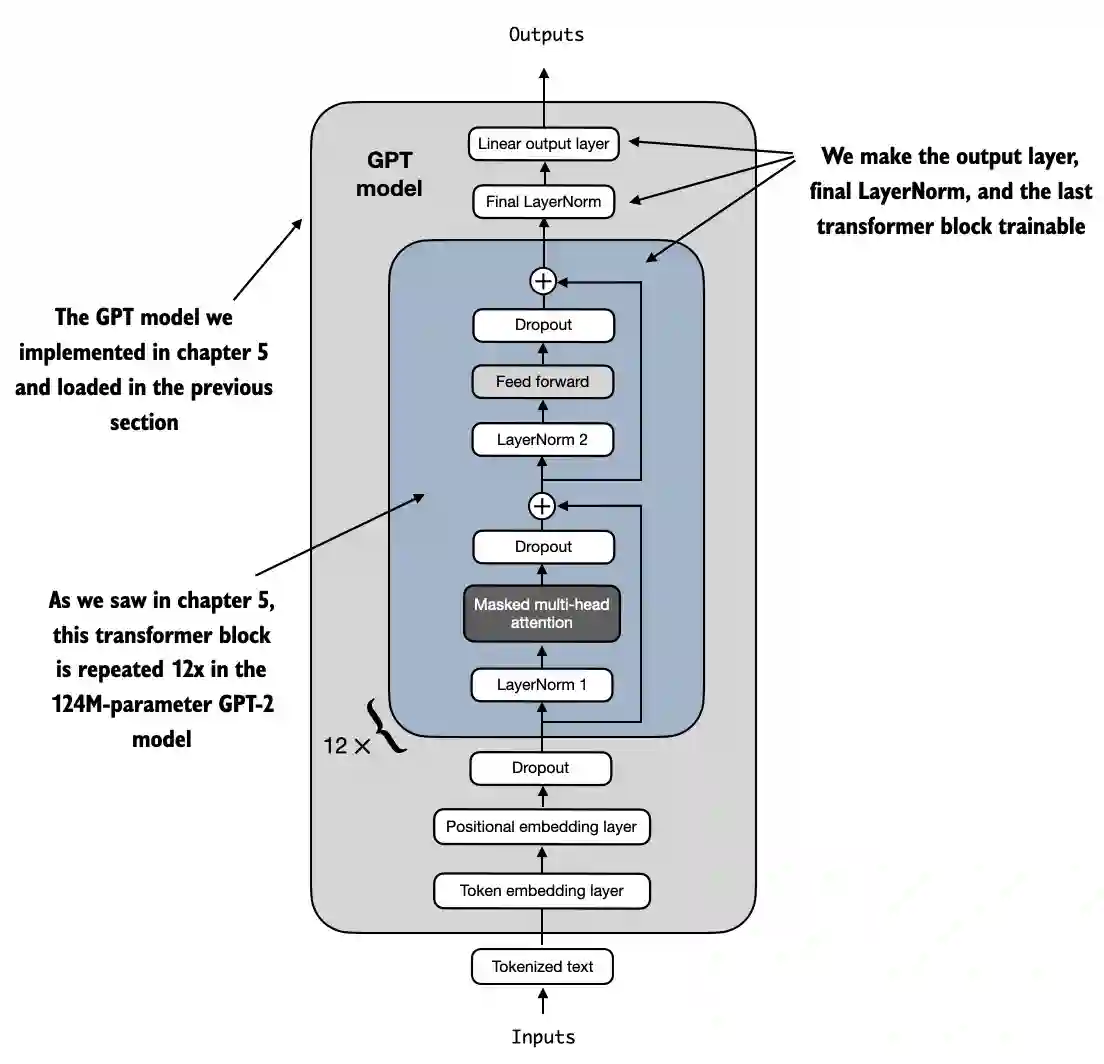
In [22]:
for param in model.trf_blocks[-1].parameters():
    param.requires_grad = True

for param in model.final_norm.parameters():
param.requires_grad = TrueIn [23]:
inputs = tokenizer.encode("Do you have time")
inputs = torch.tensor(inputs).unsqueeze(0)
print("Inputs:", inputs)
print("Inputs dimensions:", inputs.shape) # shape: (batch_size, num_tokens)
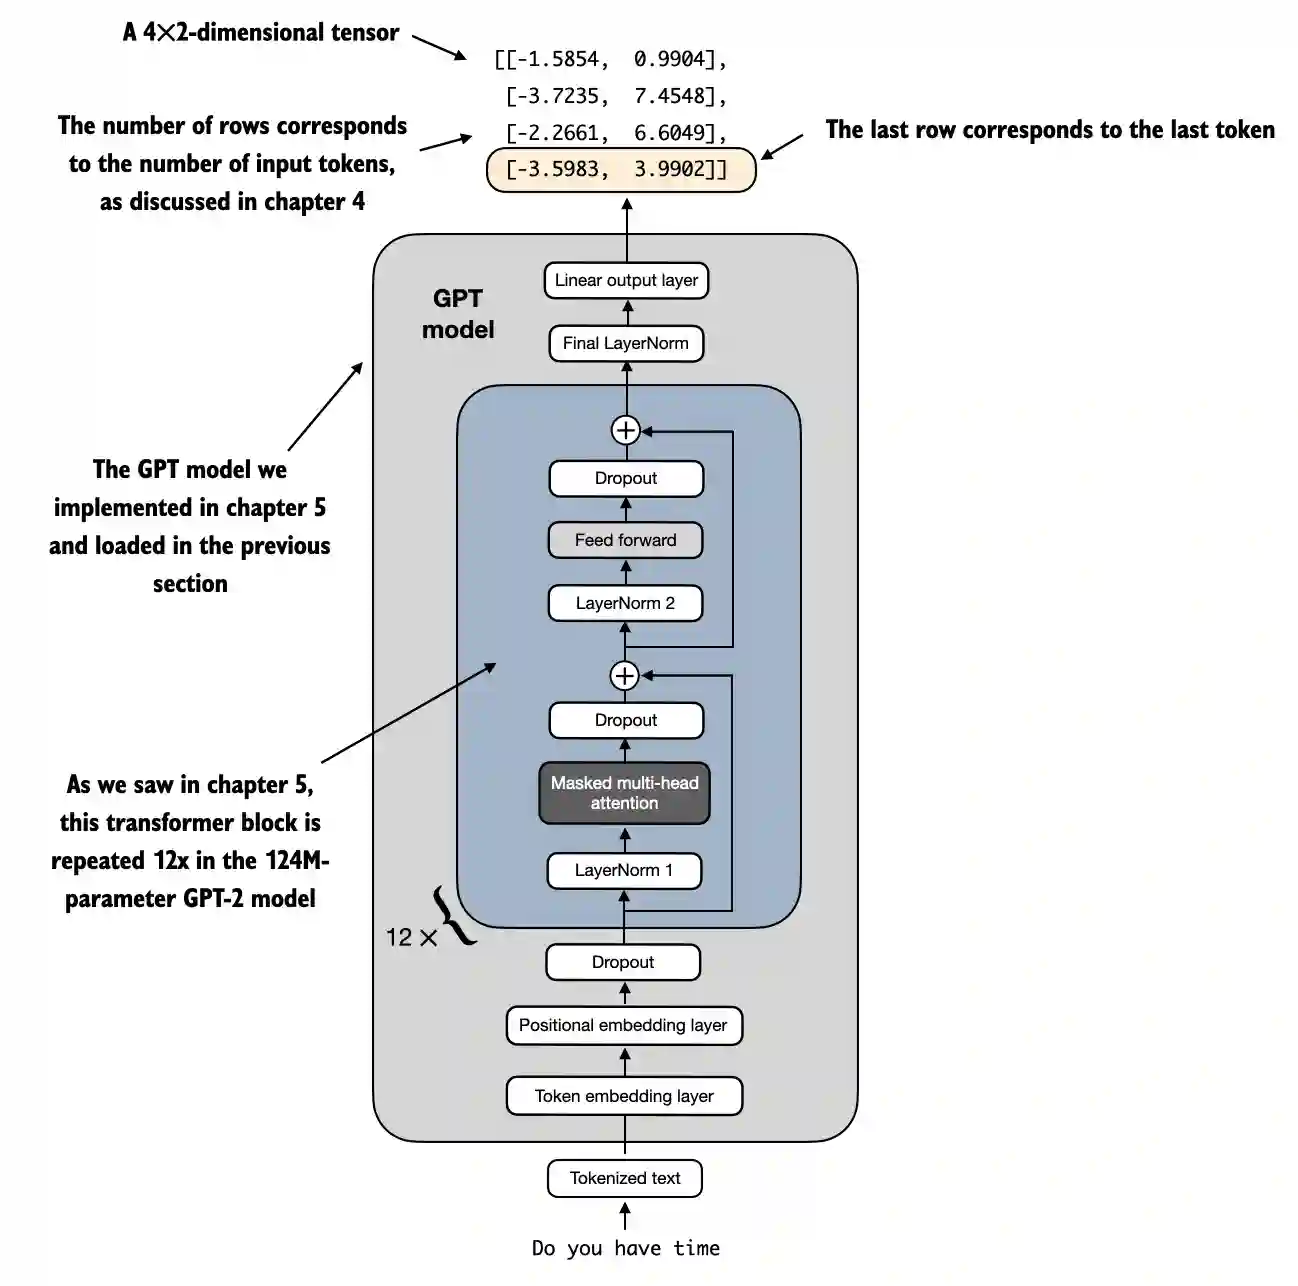
Inputs: tensor([[5211, 345, 423, 640]]) Inputs dimensions: torch.Size([1, 4])
In [24]:
with torch.no_grad():
    outputs = model(inputs)

print("Outputs:\n", outputs)
print("Outputs dimensions:", outputs.shape) # 形状: (batch_size, num_tokens, num_classes)
Outputs:
tensor([[[-1.5854, 0.9904],
[-3.7235, 7.4548],
[-2.2661, 6.6049],
[-3.5983, 3.9902]]])
Outputs dimensions: torch.Size([1, 4, 2])
In [25]:
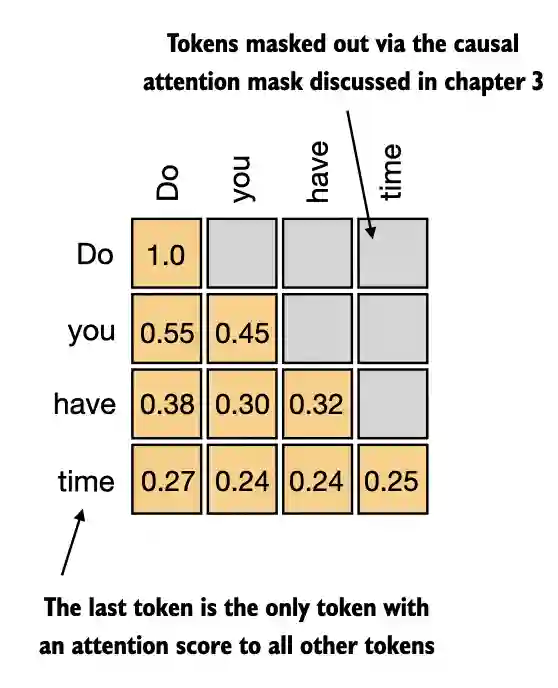
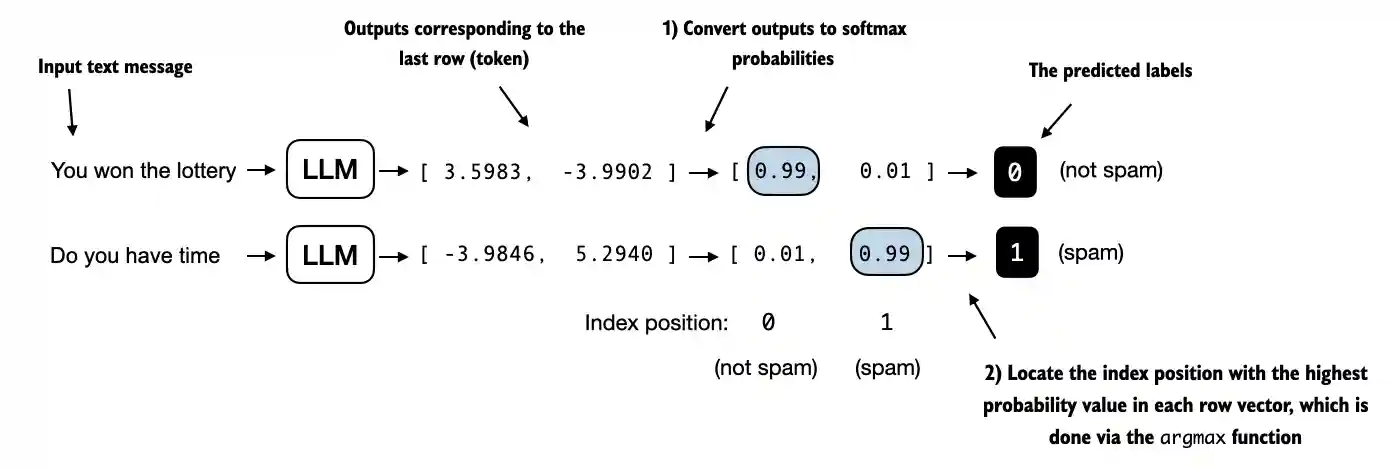
print("Last output token:", outputs[:, -1, :])Last output token: tensor([[-3.5983, 3.9902]])

In [26]:
print("Last output token:", outputs[:, -1, :])Last output token: tensor([[-3.5983, 3.9902]])
In [27]:
probas = torch.softmax(outputs[:, -1, :], dim=-1)
label = torch.argmax(probas)
print("Class label:", label.item())
Class label: 1
In [28]:
logits = outputs[:, -1, :]
label = torch.argmax(logits)
print("Class label:", label.item())
Class label: 1
In [29]:
def calc_accuracy_loader(data_loader, model, device, num_batches=None):
    model.eval()
    correct_predictions, num_examples = 0, 0

    if num_batches is None:
        num_batches = len(data_loader)
    else:
        num_batches = min(num_batches, len(data_loader))
    for i, (input_batch, target_batch) in enumerate(data_loader):
        if i < num_batches:
            input_batch, target_batch = input_batch.to(device), target_batch.to(device)

            with torch.no_grad():
                logits = model(input_batch)[:, -1, :]  # 最后输出标记的 Logits
            predicted_labels = torch.argmax(logits, dim=-1)

            num_examples += predicted_labels.shape[0]
            correct_predictions += (predicted_labels == target_batch).sum().item()
        else:
            break
return correct_predictions / num_examplesIn [30]:
device = torch.device("cuda" if torch.cuda.is_available() else "cpu")
model.to(device) # nn.Module 类不需要分配 model = model.to(device)

torch.manual_seed(123) # For reproducibility due to the shuffling in the training data loader

train_accuracy = calc_accuracy_loader(train_loader, model, device, num_batches=10)
val_accuracy = calc_accuracy_loader(val_loader, model, device, num_batches=10)
test_accuracy = calc_accuracy_loader(test_loader, model, device, num_batches=10)

print(f"Training accuracy: {train_accuracy*100:.2f}%")
print(f"Validation accuracy: {val_accuracy*100:.2f}%")
print(f"Test accuracy: {test_accuracy*100:.2f}%")
Training accuracy: 46.25% Validation accuracy: 45.00% Test accuracy: 48.75%
In [31]:
def calc_loss_batch(input_batch, target_batch, model, device):
    input_batch, target_batch = input_batch.to(device), target_batch.to(device)
    logits = model(input_batch)[:, -1, :]  # 最后输出标记的 Logits
    loss = torch.nn.functional.cross_entropy(logits, target_batch)
return lossIn [32]:
# Same as in chapter 5
def calc_loss_loader(data_loader, model, device, num_batches=None):
    total_loss = 0.
    if len(data_loader) == 0:
        return float("nan")
    elif num_batches is None:
        num_batches = len(data_loader)
    else:
        # 如果 num_batches 超过数据加载器中的批次数,则减少批次数以匹配数据加载器中的批次总数
        num_batches = min(num_batches, len(data_loader))
    for i, (input_batch, target_batch) in enumerate(data_loader):
        if i < num_batches:
            loss = calc_loss_batch(input_batch, target_batch, model, device)
            total_loss += loss.item()
        else:
            break
return total_loss / num_batchesIn [33]:
with torch.no_grad(): # 禁用梯度跟踪以提高效率,因为我们还没有进行训练
    train_loss = calc_loss_loader(train_loader, model, device, num_batches=5)
    val_loss = calc_loss_loader(val_loader, model, device, num_batches=5)
    test_loss = calc_loss_loader(test_loader, model, device, num_batches=5)

print(f"Training loss: {train_loss:.3f}")
print(f"Validation loss: {val_loss:.3f}")
print(f"Test loss: {test_loss:.3f}")
Training loss: 2.453 Validation loss: 2.583 Test loss: 2.322

In [31]:
# 总体与第 5 章中的 `train_model_simple` 相同
def train_classifier_simple(model, train_loader, val_loader, optimizer, device, num_epochs,
                            eval_freq, eval_iter, tokenizer):
    # 初始化列表以跟踪损失和看到的示例
    train_losses, val_losses, train_accs, val_accs = [], [], [], []
    examples_seen, global_step = 0, -1

    # 主要的训练循环
    for epoch in range(num_epochs):
        model.train()  # 将模型设置为训练模式

        for input_batch, target_batch in train_loader:
            optimizer.zero_grad() # 重置上一个 epoch 的损失梯度
            loss = calc_loss_batch(input_batch, target_batch, model, device)
            loss.backward() # 计算损失梯度
            optimizer.step() # 使用损失梯度更新模型权重
            examples_seen += input_batch.shape[0] # 新功能:跟踪示例而不是标记
            global_step += 1

            # 可选的评估步骤
            if global_step % eval_freq == 0:
                train_loss, val_loss = evaluate_model(
                    model, train_loader, val_loader, device, eval_iter)
                train_losses.append(train_loss)
                val_losses.append(val_loss)
                print(f"Ep {epoch+1} (Step {global_step:06d}): "
                      f"Train loss {train_loss:.3f}, Val loss {val_loss:.3f}")

        # 计算每个 epoch 后的准确率
        train_accuracy = calc_accuracy_loader(train_loader, model, device, num_batches=eval_iter)
        val_accuracy = calc_accuracy_loader(val_loader, model, device, num_batches=eval_iter)
        print(f"Training accuracy: {train_accuracy*100:.2f}% | ", end="")
        print(f"Validation accuracy: {val_accuracy*100:.2f}%")
        train_accs.append(train_accuracy)
        val_accs.append(val_accuracy)

return train_losses, val_losses, train_accs, val_accs, examples_seenIn [32]:
# Same as chapter 5
def evaluate_model(model, train_loader, val_loader, device, eval_iter):
    model.eval()
    with torch.no_grad():
        train_loss = calc_loss_loader(train_loader, model, device, num_batches=eval_iter)
        val_loss = calc_loss_loader(val_loader, model, device, num_batches=eval_iter)
    model.train()
return train_loss, val_lossIn [33]:
import time

start_time = time.time()

torch.manual_seed(123)

optimizer = torch.optim.AdamW(model.parameters(), lr=5e-5, weight_decay=0.1)

num_epochs = 5
train_losses, val_losses, train_accs, val_accs, examples_seen = train_classifier_simple(
    model, train_loader, val_loader, optimizer, device,
    num_epochs=num_epochs, eval_freq=50, eval_iter=5,
    tokenizer=tokenizer
)

end_time = time.time()
execution_time_minutes = (end_time - start_time) / 60
print(f"Training completed in {execution_time_minutes:.2f} minutes.")
Ep 1 (Step 000000): Train loss 2.153, Val loss 2.392 Ep 1 (Step 000050): Train loss 0.617, Val loss 0.637 Ep 1 (Step 000100): Train loss 0.523, Val loss 0.557 Training accuracy: 70.00% | Validation accuracy: 72.50% Ep 2 (Step 000150): Train loss 0.561, Val loss 0.489 Ep 2 (Step 000200): Train loss 0.419, Val loss 0.397 Ep 2 (Step 000250): Train loss 0.409, Val loss 0.353 Training accuracy: 82.50% | Validation accuracy: 85.00% Ep 3 (Step 000300): Train loss 0.333, Val loss 0.320 Ep 3 (Step 000350): Train loss 0.340, Val loss 0.306 Training accuracy: 90.00% | Validation accuracy: 90.00% Ep 4 (Step 000400): Train loss 0.136, Val loss 0.200 Ep 4 (Step 000450): Train loss 0.153, Val loss 0.132 Ep 4 (Step 000500): Train loss 0.222, Val loss 0.137 Training accuracy: 100.00% | Validation accuracy: 97.50% Ep 5 (Step 000550): Train loss 0.207, Val loss 0.143 Ep 5 (Step 000600): Train loss 0.083, Val loss 0.074 Training accuracy: 100.00% | Validation accuracy: 97.50% Training completed in 5.65 minutes.
In [34]:
import matplotlib.pyplot as plt

def plot_values(epochs_seen, examples_seen, train_values, val_values, label="loss"):
    fig, ax1 = plt.subplots(figsize=(5, 3))

    # 绘制针对 epoch 的训练和验证损失
    ax1.plot(epochs_seen, train_values, label=f"Training {label}")
    ax1.plot(epochs_seen, val_values, linestyle="-.", label=f"Validation {label}")
    ax1.set_xlabel("Epochs")
    ax1.set_ylabel(label.capitalize())
    ax1.legend()

    # 为所见示例创建第二个 x 轴
    ax2 = ax1.twiny()  # 创建共享相同 y 轴的第二个 x 轴
    ax2.plot(examples_seen, train_values, alpha=0)  # 用于对齐刻度的不可见图
    ax2.set_xlabel("Examples seen")

    fig.tight_layout()  # 调整布局以腾出空间
    plt.savefig(f"{label}-plot.pdf")
    plt.show()
Warning:
Output truncated. This notebook contains too many cells to display efficiently.